From the title, it sounds like a blog post about a new dance, but instead it is a polish escapade using the LacQit One Step Gel Spring 2013 collection. I decided to test out an unlikely combination; Tangerine Tango and Pop on this Purple. Check it out in my latest video:
I started out with 2 coats of the Tangerine Tango as my first color and cured each coat using my LED lamp. Next, I used nail tape to create an X shape near the upper portion of my nails.
I used more nail tape to create another X above the first one, making sure to leave a small space between the first X and second X. This will look similar to railroad tracks crossing over each other. Once the tape was in place, firmly press down to avoid any bleeding of the polish underneath the tape.
Next I used the Pop on this Purple color to paint above the first X all the way to the tip of my nail. Cure the 2nd color and apply another coat to enhance the sparkling effects.
Once the polish was cured, I removed the tape from each nail.
LacQit One Step Gel Polish has released the 2013 Summer Color Collection and the owner, Nanci Spencer, sent me some colors to try out. I decided to get a little creative and use a combination of various colors to create some nail magic. Check out my demonstration video below.
Nail art definitely adds flare to the overall look of pampered hands, but as an amateur, it is a challenge...but in a good way. The challenging aspect of nail designing is that I seem to spend hours trying to decide what look I'm going for and what color combination I should use. So in this attempt, I finally decided to use the 3 colors listed below:
In a Blue Streak
It's a White Out
A Flare for Pink
I started off with In a Blue Streak as my first color. Next, I used nail tape to section off a portion of my nails to create a color block using the It's a White Out color. Lastly, I used A Flare for Pink to create mini dots and abstract curves. Below are a few pictures of my final results:
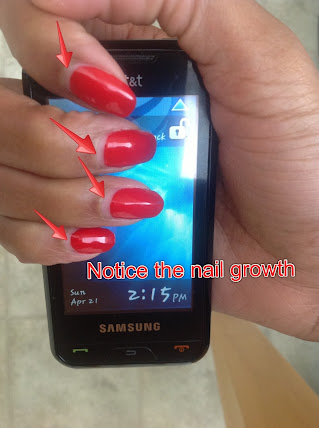
In my 8 day follow up video on the LacQit gel polish, the same radiant shine of the gel polish was as visible as it was on the 1st day it was applied. Well, I'm PLEASED to announce that as of my 15th day wear of LacQit Gel Polish that the only noticeable difference is the significant nail growth (notice the natural nail growing from the cuticle in the pictures below). I strongly feel that the nail growth by the end of next week (which will be 3 weeks of wearing this color) will make it mandatory to remove this polish. So at that point, I will do a video demonstration on the removal process and share my experience.
The pictures below show the 15 day results of LacQit One Step Gel Nail System.
This polish was applied on April 6th.Here's a link to the video demonstrating the application process.
This is the 8 day follow up video of the LacQit application.
This is my 8th day wearing the LacQit (Pronounced: LAC-IT) One Step
Gel Polish. From the video below,
you can see that I have the same lustrous shine that I had on Day 1. However, I did have a nail emergency…I broke my
thumb nail while doing BURPEEs (see Wiki description) at the gym. The impact of quickly hitting
the floor in push-up position did cause the polish to rip along the torn edge
of my nail. However, the nail did not break into the skin,
which has always been the outcome for this particular thumb nail. I contribute this to the firm support and density
of the gel polish, which acted as a buffer between my nail and the floor. I was able to cut the remaining fragmented edges
and file without massively disfiguring the remaining polished area. I opted not to retouch the thumb nail to see how
well the gel polish manages after the bonding of the polish has been disturbed.
I've applied the LacQit cuticle oil to my cuticles approximately 3 times within these past 8 days, so they are not showing any signs of cuticle damage from the gel polish or the use of the LED lamp. The oil, which is a blend of almond oil. jojoba, and rice bran oil, is very light and does not leave an oily residue. It absorbs within seconds, so I haven't had to worry about getting oily stains on my clothing. Let’s see what happens going into week 2.
Stay tuned…..
At home gel nail systems have caused a BIG BUZZ in the nail and beauty
product communities for about the past 3 years. Why is this phenomenon
so important you might ask? Well, those who visit manicure/pedicure salons
are very familiar with the longer lasting polish wear, averaging 14+ days with
minimal chipping that gel nail polish offers. However, the cost averages
around $25 and up for ONLY a manicure. For those who prefer to be
budget conscious, realize that $25 every 2 weeks averages to be around
$650 per year... AND this is on the LOW end. Think about how you could redirect
that money if you could achieve the same professional look at home.
Well, the nail industry is making it more affordable with the at home nail
systems. Retailers like Sally's, Ulta, Sephora, and Amazon have showcased brands
such as Gelish and Redcarpet. More recently local stores, like WalMart,
Walgreens, and CVS have brought attention to SensatioNAIL and other gel systems.
Although, I've never tested any of those brands, a lot of reviews that I've
read indicate customer satisfaction. However, a caveat to those gel
systems is the use of 3 polishes (i.e. base coat, gel polish, and top
coat) which cures using a UV or LED lamp within 3-5 minutes.
Since being introduced to the gel nail systems for at home use, I couldn't
decide which one to try...not until I ran across a new ONE STEP product in
Canada...YES....ONE STEP using a LED lamp. The product is called
LacQit (Pronounced: LAC-IT).
U.S. retailers should take notice of this product, especially before the Thanksgiving
and Christmas holiday seasons because the LacQit system would definitely draw the
attention of women from every socio-economic background. Mother’s Day is right around the corner, so
if you are looking for a gift, this would make your mom/wife/sister/friend VERY
happy! Think about it…for the cost of
about 3 manicures at a nail salon, they can continuously use this gel nail
system at home. Each 10ml bottle of
polish equates to about 30 applications.
LacQit is on Facebook and Pinterest. The web site is www.lacqit.com
The application process was as easy as applying 2 coats of regular nail
polish, but WITHOUT the long drying time, thanks to the LED lamp. I’ve done a demonstration of the application
process, so check out my video below:
The kits contain the following:
Technologies used
Action on my Nails
LacQit Pro LED Lamp
Cured the nail color.
1st coat: cured for 30 seconds
2nd coat: cured for 60 seconds
10 ml Nail Color (Cosmo to Go included in the kit)
Added a high gloss color pigmentation to my nails.
10 ml Moisture Cuticle Oil
Replenished moisture to my cuticle beds after the polishing process.
Nail file
Shaped nails.
Buffers
Used to remove shine from nails BEFORE applying gel polish.
Cuticle (Manicure) Sticks
Used to push cuticles back BEFORE applying the gel polish.
Timer
Used to accurately time the use of the LED lamp to cure gel polish.